
| Lesson 10 | |
|
| Home Page; Lesson 10; Lecture Notes |
Backgrounds remain the same whether you are using natural or artificial light, and relate to what available light there is in the sea. Consequently, the colour and shading of your background is a result of how much you point your camera up at the sun, and how wide your aperture is. The tables below assume an ISO 100 film taken at a depth of about 10 metres, using a 1/90 shutter speed.
 |
Figure 19. f/16 starts to reveal some shadow detail, with a royal blue background |
 |
Figure 20. f/11 shows improved detail with an aquamarine background |
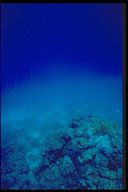 |
Figure 21. f/8 shows good colours against sky blue water |
 |
Figure 22. f/5.6 is almost overexposed with a pastel blue background offering little contrast |
 |
Figure 23. f/22 shows black water with a sharp sunburst |
 |
Figure 24. f/16 shows very dark water with a still well-defined sunburst |
 |
Figure 25. f/11 shows a good circle of blue water and an effective top to bottom graduation |
 |
Figure 26. f/8 is getting a bit light with the sun dominating the shot. |
 |
Figure 27. f/22 again delivers sharp, small, distinct beams, very contrasty, with a sharp fall-off to black |
 |
Figure 28. f/16 shows the pool of light around the sun getting bigger, and the dark starting to recede. |
 |
Figure 29. f/11 shows a still bigger pool of light |
 |
Figure 30. At f/8, the centre of pool is starting to dominate photograph and wash it out |
Remember with all these tables, that the difference between the very dark and the overexposed is only two stops, and there is only a one-half stop between successive f-numbers. These colour differences are therefore only possible with slide film, which has a �1 stop exposure latitude. If you used a print film, with a �4 stop latitude, all the shots would probably look identical. Note that UK light levels tend to be at least one stop below the tropical levels used here, and the colour will be green rather than blue.
Do think about the sort of background that you want in your photographs, and don't rigidly stick to the colour you think looks best. The background is merely that - a backdrop for your foreground subject, so think about providing suitable colour contrasts.
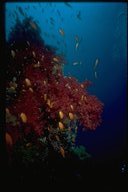 |
Figure 31. Red subjects like antheas look good on a blue background. |
 |
Figure 32. Blue subjects like fusiliers, or blue triggers look good on a black background. |
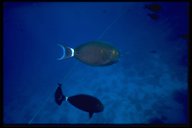 |
Figure 33. Black fish like tangs need a lighter background. |
It is also possible to get the advantages of rays of sunlight and the light to dark graduations without having to have the sun actually in the frame. This way the sun does not appear in the image as a subject, but you still get to retain the pretty background. You can either put the sun just out of the frame, or hide it behind something to create a silhouette
Silhouettes are a very popular photographic style, and can be easily achieved by putting the sun behind a diver, fish, wreck, coral wall, etc. Because of the diffraction and diffusion of light in water, silhouettes will be blacker when the subject is nearer the camera rather than further away.
 |
Figure 34. A effective silhouette of a rather 'untidy' diver. Encourage your models to look sleek underwater. |
Natural light may not always work for you, and you are likely to need to considerably overexpose at depths much greater than 25m in order to get a good blue background, which will not be very graduated even if done very well.
Pushing film, one option when it starts getting dark, is not particularly recommended as the results tend to be more grainy, and the developing can cost almost twice as much. It is probably better to use the options available to you, such as shutter speed to expose film properly.
On wrecks, use torchlight (or videolights) to guide the viewer's eye to any particular feature (portholes etc.) that you want to emphasise, but a diver with a torch will add a focus of interest all on his own if necessary.
 |
Figure 35. An 'atmospheric' shot of a diver in British waters. The torch light provides a focus in what would otherwise be a fairly plain shot. |
Automatic exposure can be useful in such difficult lighting situations, but don't rely on it, and bracket your exposures widely. You may need some form of underwater tripod to keep your camera still for the necessary long exposures.
The most common mistake is being too far away for the strobe to work properly, especially with macro, so know your strobe's capabilities, and get in close.
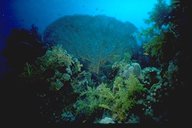 |
Figure 36. The gorgonia in this photo is too far away from the strobe to be correctly illuminated, unlike the foreground. |
The second most common mistake is not pointing both the camera and the strobe at the subject at the same time, so either set up your strobe properly at the start of the dive, or constantly remind yourself to point it at the actual image, and not the virtual one. If manually aiming the strobe, aim it for about one third further away.
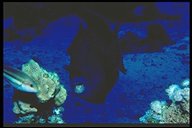 |
Figure 37 A lovely specimen of a blue trigger, which has only had the edge of his mouth illuminated. |
Don't ever take just one shot of a subject, use two or three with possibly different strobe angles. You will get much better results if you handhold the strobe away from the camera, and try to minimise backscatter by experimenting with toplighting, backlighting, or sidelighting.
Basic strobe angles are:
The strobe is placed above and to the left of the camera. This simulates the angle of the sun, and can give a slight halo sometimes. For some reason it just doesn't work as well if it is coming from the right, for reasons that might be related to eye dominance or an unconscious scanning from left to right. The shadows that are cast underneath give dimension and depth as long as they are not too dark.
Both of these lighting angles come from the plane of the subject, and therefore maximise contrast and surface texture in the subject. Which you prefer is a matter of taste. This type of lighting however � can help to eliminate unwanted backgrounds, but .. � can leave one side in shadow � can show shadows of extension tube framers
 |
Figure 38 Sidelighting of this red coral has been taken a bit too far, and has resulted in flare (the square lights) due to the strobe being 'seen' by the lens. |
This type of lighting casts the front part of the subject in silhouette, and highlights other surfaces such as the top and sides. It can be very effective in highlighting fine detail, such as coral polyps and stinging cells. Be careful about the positioning of the strobe - you don't want to see it in the picture, and even if it is out of the picture, if the light falls directly on the lens it is bound to cause flare or internal reflections.
If you are forced to use manual flash, then you will always benefit from bracketing, and your results will improve if you get in the habit.
Even when using TTL, bracket on certain shots if the camera will do it. This become more important with subjects of high contrast or high or low reflectivity. Remember that TTL sensors in the camera tend to be centre weighted, and balanced to the standard 18% grey, so exposure can be off if the subject is not in the centre of the frame, or if the subject is not 18% grey.
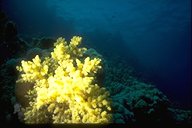 |
Figure 39 An off-centre subject of high reflectivity has been overexposed when using TTL on the Motormarine II.. |
A diffuser can soften colour temperature and widen angle, and some people use one all the time, but you may lose one or two stops of light by using one.
Two strobes can help provide a more constant and balanced illumination, but are quite likely to ruin a good photo if not used properly, and it is therefore best to always take a shot with single TTL before introducing a second strobe, then start experimenting.
A proper dedicated two strobe outfit is best, with one strobe in standard position, and the second on the other side of the camera, delivering about one stop less light. This way you can improve both the quality of light (and thus the ambience) and coverage of wide-angle shots.
A smooth graduation between the strobe-illuminated foreground, and the ambient light background is an important visual element in photographs of this nature. The appearance of obvious pools of strobe light in the photograph is not conducive to a 'natural' effect. In a perfectly balanced exposure, you may not be able to tell that a flash was used at all.
Of course, the perfect balance would be obtained without any strobe illumination at all, but then none of the true colours would come out. The use of the strobe is therefore essential, but must be moderated to provide true rendition of the colours in the scene without over-illuminating the foreground subject.
As always, it is important to decide on your initial background colour first, then paint in with the strobe. Different lighting effects, and balances can be achieved by moving the strobe in and out, and you don't necessarily need a wide beam flash as you are only lighting one part of the frame.
The sophistication of the Nikon land cameras when combined with a SB-24/25/26 provide excellent balanced strobe light, as they are designed to do, and creative options are available to reduce the output of the strobe by up to 3 stops by 1/3 stop at a time still under TTL control while maintaining ambient exposure.
| Lesson 10 | Previous Page | Next Page | Lesson Contents | Home Page |
![]()
This page was last updated on 11 August 1998
Please address any comments to Mark
Mumford