
| Lesson 11 | |
|
| Home Page; Lesson 11; Lecture Notes |
Good photographs don't need 'interesting' subjects, but don't go for technically perfect, but boring shots. Having said which, any opportunity to photography an emotive subject like a shark or whale should be taken, however bad the result look likely to be!
Composition is about the way that you arrange the subject in the frame. It's about perceiving and presenting your subject in the way that you want. It's about taking a viewpoint, and communicating that to your audience. It's about expressing yourself in the subject matter you choose to photograph, and the way you choose to photograph it.
However arty and highbrow you wish to express it, composition is about finding an ordinary subject, and capturing an extra-ordinary image of it.
Seeing your subject is easy. If you're close enough to the reef, and you are scanning for subjects, and have learned to recognise all the clever camouflages that the underwater life can adopt, then you will spot your subject. This is just the beginning.
Learn to spot your subjects underwater
Once a subject has caught your eye, really look at it, and assess its potential to make a good photograph, and whether you are carrying the right equipment to do it justice. If you're not, and the subject appears territorial and is likely to stay where it is, then come back for it on another dive.
You need to think about natural design in the subject matter, and how you can capture this by designing a photograph around it, enhancing and enriching it. You can then realise this design potential with good exposure, and subsequently with good developing and printing.
Some things to think about when designing your photograph:
Many stunning photographs are very simple, even stark. They are uncomplicated, yet appealing, due to a number of factors that all come together to produce a memorable image, rather than a mundane one.
As you are designing your photograph, think about
You've only got a small rectangle to work with, so think about
Technical things, although secondary, are important, so
Composition involves recognising and exploiting visual features, and framing them in the strongest, most effective way. Composition includes the manipulation of lines, shapes, areas of colour, differences in tone, and a host of other things.
To take the right photograph, you need to understand why you are taking the photograph at all. Who is your target audience - non-divers, divers, other underwater photographers, your mum, the Diving Magazine Editors? What are you trying to show them? Are you trying to be artistic, documentary, or illustrative? You might like to think about how your photographs will be analysed for subject content, structure, technical qualities, and meaning.
When considering photography style in general, that is easy, as you are probably already pigeon-holed by the general photographic community as an underwater natural history specialist, so be happy with that and focus on it. They will however be quite capable of examining the various elements of your technique, particularly exposure, lighting, depth of field, and perspective.
There are a great number of things that you must consider in your images, such as
Other compositional hints are:
The eye can distinguish millions of different colours, but colour vision can be broken down to a few simple concepts.
The retinas of our eyes have cones that perceive colour as red, green, or blue. Each colour in the visible spectrum can be therefore reduced mathematically to groups of three numbers. These numbers were developed into international standards of colour perception in the 1920s by the "Commission Internationale d'Eclairage" in France, commonly known as C.I.E. An interesting variant on this principle of "trichromacy" is that we have much fewer blue cones in our eyes and very few of them occur in the focusing centre of the eye.
Colour attracts the eye, so it is good to use colour to direct attention, although too many colours can become confusing. Context is critical. Blue is a poor colour for small, thin elements, because as we lack blue cones it is hard to focus on. But blue works very well as a background, which suits us very well as underwater photographers.
We can classify colours in terms of three properties: hue, saturation, and luminosity.
These properties are actually quite independent of one another
Hue describes what the pure underlying colour is

Saturation describes how much of the pure colour there is compared to all the other colours ( which together would make grey).

Luminosity is a measure of how bright the colour is. 100% luminosity is always white, and 0% luminosity is always black.

Use colour to show relatedness or grouping - for instance, we tend to see all the red things in a photo as belonging together. It is important to remember that about 10 percent of the adult male population has some form of colour confusion, with a small fraction of that being true red/green colour blindness.
Colour has emotional properties: red excites the eye, blue calms it. But everyone has a different taste in colour - some people love pink, others hate it. Fluorescent colours can be garish, and pastel colours can be relaxed. People often respond better to bright saturated hues. If colours are well chosen, they improve marketability and give an impression of friendliness
Colour also has spatial properties: we tend to see the edges of objects with our black and white receptors (rods) and then fill in the edges with colour. We always see colours in relationship to the other colours around them. This influences the colour next to it. The red/green opponent cones contribute to our tendency to see colour in opposites because we have difficulty focusing on both red and green at the same time.
As the 35mm image is not square, you have two primary framing options,
Balance in the frame is provided by - horizons / vertical lines / divisions
Three primary considerations in composition
You must consciously think about the format of your image. Which would be best - Portrait or Landscape? This may change shot by shot, but if in doubt take one of each, and cover both options.
 |
Figure 40. A portrait shot of some colourful coral |
 |
Figure 41. A landscape shot of the same scene |
The image will appear to be more balanced if the thirds intersections are used
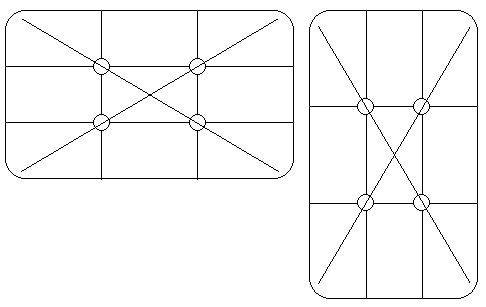
Diagonals and other lines in the frame can be very powerful compositional elements, but don't restrict yourself - if diagonals don't appear naturally, then tip the camera on its side until they do. You may even find it possible to get an implied diagonal with the two eyes of one subject at opposing intersections.
 |
Figure 42. An anchor/shot line may be one of the few straight lines you see underwater |
Positive and Negative Space are terms that refer, not to the charactaristics of the film you are using, but to elements in the photograph.
Positive space includes the elements of the photograph that you require to complete your composition, essentially your primary and secondary subjects. Negative space includes everything else in the photograph, such as foregrounds, backgrounds, and any other items, including backscatter, shadows, etc.
Usually negative space will distract from the primary subject, but with careful selection it can occasionally enhance it (blue fish on red coral etc.). The best negative space is black - as the subject will always stand out (unless it's black itself!) So the rule is to always eliminate any distracting foreground or background.
 |
Figure 43. Poor negative space, with the photo taken shooting down into the sand. I've even done worse than that, and included the shadow of the fish in the frame. |
 |
Figure 44. Better use of negative space, with a plain black background, although there is probably too much of it. |
Subject selection makes the biggest difference between good photographs and snapshots. Positioning is all-important, and any subject must stand out against negative space. Choose subjects growing proud of rocks/reef that can be photographed against open sea, or pick subjects that give you loads of choice in camera and flash angles.
Remember conservation, and the 'don't touch' rule - if you've got a good subject but it's poorly placed, don't pick it up and move it, find another angle or another subject.
Think about the final picture - Visualise it - put it in your mind's eye. When photographing, initial composition is by eye (standard perspective), which will always be too far away. You must compose through the viewfinder, and you must get really close, and believe the framing in the viewfinder (or carry a slide mount around to use as a frame!)
Don't waste space in a picture, fill it with your primary subject, and check the corners of the frame to include / exclude what you want.
Never ever bother taking a photo of a fish swimming away from you, but try to take fish with their mouth open and their eyes either looking into the camera, or at a secondary subject. If the subject's eye is visible in the frame, then it must be in focus, so either:
 |
Figure 45. Fish swimming away from you are a no-no.. |
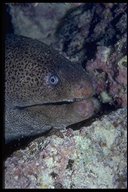 |
Figure 46. A reasonable shot of a moray eel.. |
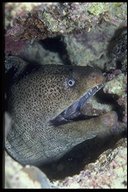 |
Figure 47. but he looks much better with his mouth open. |
However wonderful auto-focus lenses may be, with the Nikon systems, the focus detectors monitor the centre of the frame, and there is an overpowering urge to take the shot with the primary subject in the centre of the frame, rather than at one of the thirds intersections.
It is therefore important to realise that focus is not the final element in your composition, and that you usually have to re-compose your frame once the subject is in focus. This may require you to use the AF lock control on your housing (if you have one), while other cameras may automatically lock the focus until it is reset by re-focusing. This is another reason why many prefer the flexibility of being able to switch to manual focus when necessary.
Although these have been mentioned before, it is worth repeating that the basic wide-angle underwater photographic styles are:
There is a difference between Diver portraits, and Diver mugshots. You will achieve a much better balanced result if your diver is not looking directly into the lens, but focusing on an interesting foreground subject.
 |
Figure 48. Mugshots - Their mummies might be pleased, but it isn't going to win you many contests!. |
Place your primary subject, a small fish or marine invertebrate about 3ft from the camera, and position the diver no more than 5ft from the camera. Try and place them in opposite corners of the frame. Ensure that the diver is making eye contact with the primary subject, but position him/her so that their face will be fully illuminated, and both eyes will be visible in the frame.
 |
Figure 49 The diver's face isn't as well lit as it might be in this example. |
A variation on this theme is the 'distant diver' shot, where the diver provides a more distant, and therefore unilluminated secondary subject.
With this type of shot, you need to shoot in the vertical format to suggest drama and depth, and aim at an acute upward angle in order to incorporate a long blue graduation. Position your primary subject, something colourful, close to the lens to dominate the shot, and position the diver against open blue water about 10 to 15 feet away. This is another occasion when a diver can hold a video light to good effect. You needn't always use a diver as your secondary subject, and a boat on the surface, or a school of fish works equally well.
 |
Figure 50. The coral in the foreground over-dominates the shot, and the diver is a little too distant in this example |
In addition to the silhouette types mentioned earlier, taking photographs of divers decompressing on shot lines can turn in good results. The shot line itself is a crucial compositional item, and you must have it running through the frame, on a major diagonal, to act as an anchor for the photograph as well as the divers.
 |
Figure 51. A shower of divers illustrates the potential of this technique. |
Remember to turn off your strobe for these available light shots, unless of course you are clever enough to be able to capture a good silhouette with a colourful foreground subject as well. Balance for available light, but decide how much of the frame you want in shadow, and where the light sensor is going to read from, and therefore how many stops you need to underexpose to give the right result.
 |
Figure 52. A lionfish illuminated on the wreck of the Giannis-D. |
The distortion of perspective with fisheye lenses makes them generally unattractive for use in diver portrait photography when the diver is anywhere close to the lens. However, their perspective changes make them an ideal choice in wreck and cave photography where an illusion of depth and space can be obtained in enclosed spaces, or in poor visibility conditions. Used creatively, you can make lines converge into the distance, yielding (false) impressions of space, and seemingly unlimited visibility - only you know better!
When it comes to lighting, unfortunately, with a 170 degree angle of coverage, your strobe, with its feeble 90 degrees will have little chance of illuminating any more than a tiny part of the frame. It can help to restore colour into a small foreground subject tucked away in the corner of the frame, but is unlikely to be of much more benefit than that. If you are using a strobe, then placement is critical, as your usual strobe position will probably place it within the frame and ruin what might have been a good image.
You need to plan your lighting as much as you plan the composition itself. The success or otherwise of professional portrait photographers has much to do with how they choose to light their subjects, and you need to consider all the options as well.
Evenness does not come automatically, and is a function of the distance of the nearest and farthest points that will be illuminated in the frame (especially on close focus wide angle). The strobe intensity will vary according to the light output, distance of the light source, and the light absorbing material that it passes through. It is worth knowing that, theoretically, when taking a flat subject with a 90 degree wide angle lens, from a distance of 1 metre, and holding your strobe in its normal top/left position, there may be as much as one whole stop difference from one corner of the frame to the other due to the differences in distance from the strobe. Remember that a strobe will only light one distance 'correctly'.
Lighting is always going to be more diffused in macro work, as the relative size of the strobe tube is much bigger than with wide angle shots, and so the light will appear to be coming from a broad area, and not one particular point.
Proper prior planning will help you ensure the correct result before you commit to pressing the shutter.
Many of the more striking photographs I have seen involve both a large and small subject. I particularly remember one of a blue starfish with a smaller yellow starfish resting on one of the larger starfish's tentacles.
This topic can be extended to include a wider scope, such as fish in their environment. For example, a clownfish in its anemone is probably going to make a more interesting photo than a clownfish on a black background - however that happens to annoy the negative-space purist.
Pictures of cleaner wrasse or cleaner shrimps engaged in the process of cleaning make more interesting pictures, as does any other sort of interaction between marine life, be it the predator/prey relationship, or courtship or mating rituals. You may stumble across these by chance, but a wide and varied knowledge of marine biology is more likely to permit you to plan for these sort of shots, and even set them up in advance.
Some other pointers on technique are:
| Lesson 11 | Previous Page | Next Page | Lesson Contents | Home Page |
![]()
This page was last updated on 11 August 1998
Please address any comments to Mark
Mumford